Getting Started with Arduino on your GNU/linux machine
Arduino is a micro-controller which is programmable to do many tasks. To program it, a compiler and a linker is required. Arduino has its own IDE named after itself. Following is a guide to install the compiler under Linux(UBUNTU).
Installing Arduino on Ubuntu 12.04
To install Arduino on Ubuntu 12.04 is very simple.
Step 1: Open your terminal.
Step 2: type the following command:
Sudo apt-get install arduino , press 'y' if asked to download the dependencies.
Step 3: Arduino is installed, to run just type the command arduino in your terminal or search for the app 'arduino' and your good to go.
For using arduino scroll down to the end of the page.
Installing Arduino on Ubuntu 11.10 and previous versions
The latest version of arduino is not present in the ubuntu repositories, so there will be a lil procedure you need to follow.
(LINES IN RED ARE TO BE TYPED ON THE TERMINAL)
First you need to install a few dependencies,
sudo apt-get install librxtx-java
sudo apt-get install arduino-core
sudo apt-get install arduino
sudo apt-get install avr-libc
sudo apt-get install gcc-avr
This will install all dependencies and also an older version of arduino on you machine.
Next download the latest version of arduino from here: 32bit/64bit
Once downloaded, extract the files into a location where you want it installed.
go to the location where the files are installed using:
cd /where/you/have/your/files
Now we need to give permissions to the executable files:
sudo chmod 777 arduino
also search for a file with the name avrdude and repeat the same command.
Finally you need to give permissions for the program to use the USB port,so that you do not need to be ROOT always:
for this use the command:
sudo usermod -a -G tty yourUserName
sudo usermod -a -G dialout yourUserName
Log off and log on again for the changes to take effect!
Once this is done you can run the file named arduino.sh to start arduino, if your using the terminal type: ./arduino
Testing your setup!
Connect the arduino board to your computer using the USB cable.
you will notice the power led on the board go ON.
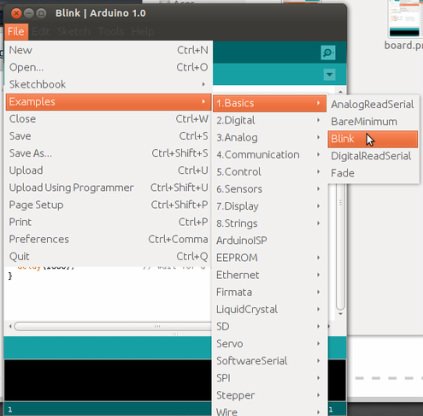
Start the arduino program on your computer, and for an example open the Blink program,
File>examples>basics>blink
you will notice the power led on the board go ON.
Start the arduino program on your computer, and for an example open the Blink program,
File>examples>basics>blink
Next you need to select the board you are using, If your using a board with atmega8 choose the last option :arduino NG
Then choose the Serial port, in linux the serial port will have the name ttyACM# (# is a number).
once selected, it can be verified at the bottom right of the window.
Then to upload it goto File>Upload.
VOILA! your done.
Then choose the Serial port, in linux the serial port will have the name ttyACM# (# is a number).
once selected, it can be verified at the bottom right of the window.
Then to upload it goto File>Upload.
VOILA! your done.
Common Errors!
Though the whole process is simple, you may face errors while working with arduino,the common errors are:
1) Device signature mismatch....<With some technical description>
This means that the atmega chip you are using is either spoilt or creating trouble.
to rectify: bootloader the chip with arduino(will be discussed in future tutorials)
IF it does not work, buy a new atmega, the old one is unusable.
2) some long java exception, but you read permission denied in the first line.
This error occurs when you are running in the user mode and have not granted the proper permissions to all executable.
Browse to the file specified using your terminal and give it appropriate permission using the command:
sudo chmod 777 <file>
3) could not sync sync() error
This occurs if your computer did not find the atmega chip, try disconnecting and reconnecting the board, if this does not work you will have to bootload the chip with arduino again
